3.使用串口读取IMU数据并通过话题发布
0x00 简介
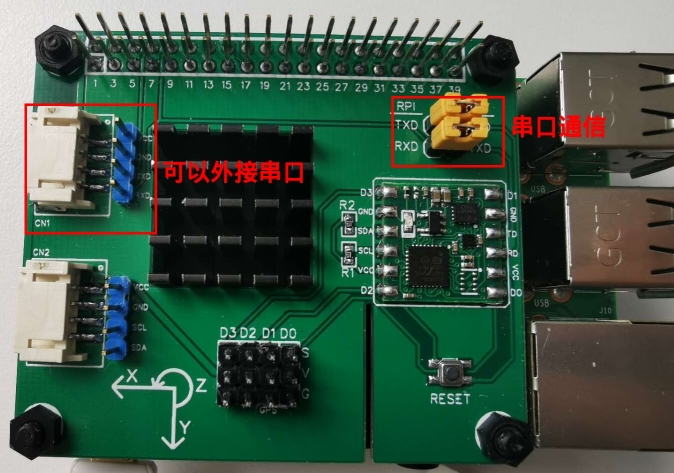
我们的IMU扩展板是支持通过串口方式来读取IMU数据,现在代码已经开发完成。前面文章介绍的都是将IMU板插在树莓派上,然后使用树莓派的IIC接口来数据通信。因此是不需要额外接线就可以发布imu话题的,若使用串口进行通信的话,若IMU板还是在树莓派上使用。那仍然是可以不用接线的,因为在树莓派排针处也是有串口的,我们可以直接使用该串口进行通信。但是若将imu板使用在其他平台上,例如jetson nano板,我们的x86电脑,这样就需要使用一个USB转串口模块接上线来通信了。
这里需要注意的是两个黄色的跳线帽,他们是IMU模块与外部串口通信的开关。当跳线帽接上去的时候,IMU模块的数据可以通过串口发布出去。如果将跳线帽拔下,那imu模块的信息将无法通过串口发布出来。所以,当只使用IIC通信获取IMU模块数据,不使用串口时,可以将该串口跳线帽取下来,这样就可以防止IMU模块通过串口将数据发布出来。
0x01 ROS代码
首先来看一下launch文件,这是启动IMU板串口通信代码的入口,主要负责启动serial_imu_node节点,代码如下:
<!--
  Copyright: 2016-2020 https://www.corvin.cn ROS小课堂
  Description:使用串口来读取imu模块的数据,并在ros中使用话题发布出来.
  Author: corvin
  History:
    20200401: init this file.
-->
<launch>
  <arg name="imu_cfg_file" default="$(find serial_imu_hat_6dof)/cfg/param.yaml" />

  <node pkg="serial_imu_hat_6dof" type="serial_imu_node" name="serial_imu_node" output="screen">
    <rosparam file="$(arg imu_cfg_file)" command="load" />
  </node>
</launch>
在launch文件的第一行,可以看到一个arg参数,这里指定的是serial_imu_node在启动时需要加载的yaml配置文件。该配置文件如下:
################################################
# Copyright: 2016-2020 www.corvin.cn ROS小课堂
# Description:使用串口进行通信时的配置信息.
#   imu_dev:指示串口设备挂在点,如果使用usb转串口
#     模块,都是写ttyUSB0,1,2等.如果使用树莓派的
#     GPIO排针处串口,则使用ttyS0.
#   baud_rate:串口通信波特率
#   data_bits:数据位
#   parity:数据校验位
#   stop_bits:停止位
#   pub_data_topic:发布imu数据的话题名.
#   pub_temp_topic:发布imu模块温度的话题名.
#   link_name: imu模块的link名.
#   pub_hz:话题发布的数据频率.
# Author: corvin
# History:
#   20200402: init this file.
################################################
imu_dev: /dev/ttyUSB0
baud_rate: 9600
data_bits: 8
parity: N
stop_bits: 1

pub_data_topic: imu_data
pub_temp_topic: imu_temp
link_name: base_imu_link
pub_hz: 10
接下来是serial_imu_node节点代码,使用C++来实现的,代码如下:
/**************************************************
 * Copyright:2016-2020 www.corvin.cn ROS小课堂
 * Description:使用串口来读取IMU模块的数据,并通过
 *   topic将数据发布出来.
 * Author: corvin
 * History:
 *   20200403: init this file.
 **************************************************/
#include <ros/ros.h>
#include <tf/tf.h>
#include "imu_data.h"
#include <sensor_msgs/Imu.h>


int main(int argc, char **argv)
{
    float yaw, pitch, roll;
    std::string imu_dev;
    int baud = 0;
    int dataBit = 0;
    std::string parity;
    int stopBit = 0;

    std::string link_name;
    std::string imu_topic;
    std::string temp_topic;
    int pub_hz = 0;
    float degree2Rad = 3.1415926/180.0;
    float acc_factor = 9.806/256.0;

    ros::init(argc, argv, "imu_data_pub_node");
    ros::NodeHandle handle;

    ros::param::get("~imu_dev", imu_dev);
    ros::param::get("~baud_rate", baud);
    ros::param::get("~data_bits", dataBit);
    ros::param::get("~parity", parity);
    ros::param::get("~stop_bits", stopBit);

    ros::param::get("~link_name", link_name);
    ros::param::get("~pub_data_topic", imu_topic);
    ros::param::get("~pub_temp_topic", temp_topic);
    ros::param::get("~pub_hz", pub_hz);

    int ret = initSerialPort(imu_dev.c_str(), baud, dataBit, parity.c_str(), stopBit);
    if(ret < 0)
    {
        ROS_ERROR("init serial port error !");
        closeSerialPort();
        return -1;
    }
    ROS_INFO("IMU module is working... ");

    ros::Publisher imu_pub = handle.advertise<sensor_msgs::Imu>(imu_topic, 5);
    ros::Rate loop_rate(pub_hz);

    sensor_msgs::Imu imu_msg;
    imu_msg.header.frame_id = link_name;
    while(ros::ok())
    {
        if(getImuData() < 0)
            break;

        imu_msg.header.stamp = ros::Time::now();
        roll  = getAngleX()*degree2Rad;
        pitch = getAngleY()*degree2Rad;
        yaw   = getAngleZ()*degree2Rad;
        if(yaw >= 180.0)
            yaw -= 360.0;

        //ROS_INFO("yaw:%f pitch:%f roll:%f",yaw, pitch, roll);
        imu_msg.orientation = tf::createQuaternionMsgFromRollPitchYaw(roll, pitch, yaw);
        imu_msg.orientation_covariance = {0.0025, 0, 0,
                                          0, 0.0025, 0,
                                          0, 0, 0.0025};

        imu_msg.angular_velocity.x = getAngularX()*degree2Rad;
        imu_msg.angular_velocity.y = getAngularY()*degree2Rad;
        imu_msg.angular_velocity.z = getAngularZ()*degree2Rad;
        imu_msg.angular_velocity_covariance = {0.02, 0, 0,
                                               0, 0.02, 0,
                                               0, 0, 0.02};

        //ROS_INFO("acc_x:%f acc_y:%f acc_z:%f",getAccX(), getAccY(), getAccZ());
        imu_msg.linear_acceleration.x = getAccX()*acc_factor;
        imu_msg.linear_acceleration.y = getAccY()*acc_factor;
        imu_msg.linear_acceleration.z = getAccZ()*acc_factor;
        imu_msg.linear_acceleration_covariance = {0.04, 0, 0,
                                                   0, 0.04, 0,
                                                   0, 0, 0.04};

        imu_pub.publish(imu_msg);
        ros::spinOnce();
        loop_rate.sleep();
    }

    closeSerialPort();
    return 0;
}
对于上述代码,特别需要注意的是在将欧拉角转换为四元数的时候调用tf::createQuaternionMsgFromRollPitchYaw()的三个参数roll、pitch、yaw需要为弧度值,不能直接将角度放进去。这里完整的思路是:
(1)添加头文件 #include <tf/tf.h> 和 #include <sensor_msgs/Imu.h>
(2)声明要在话题中发布的imu消息,sensor_msgs::Imu imu_msg;
(3)直接调用tf::createQuaternionMsgFromRollPitchYaw()为imu_msg的orientation赋值,这里需要注意roll、pitch、yaw为弧度值,三个参数顺序不能错了:
imu_msg.orientation = tf::createQuaternionMsgFromRollPitchYaw(roll, pitch, yaw);
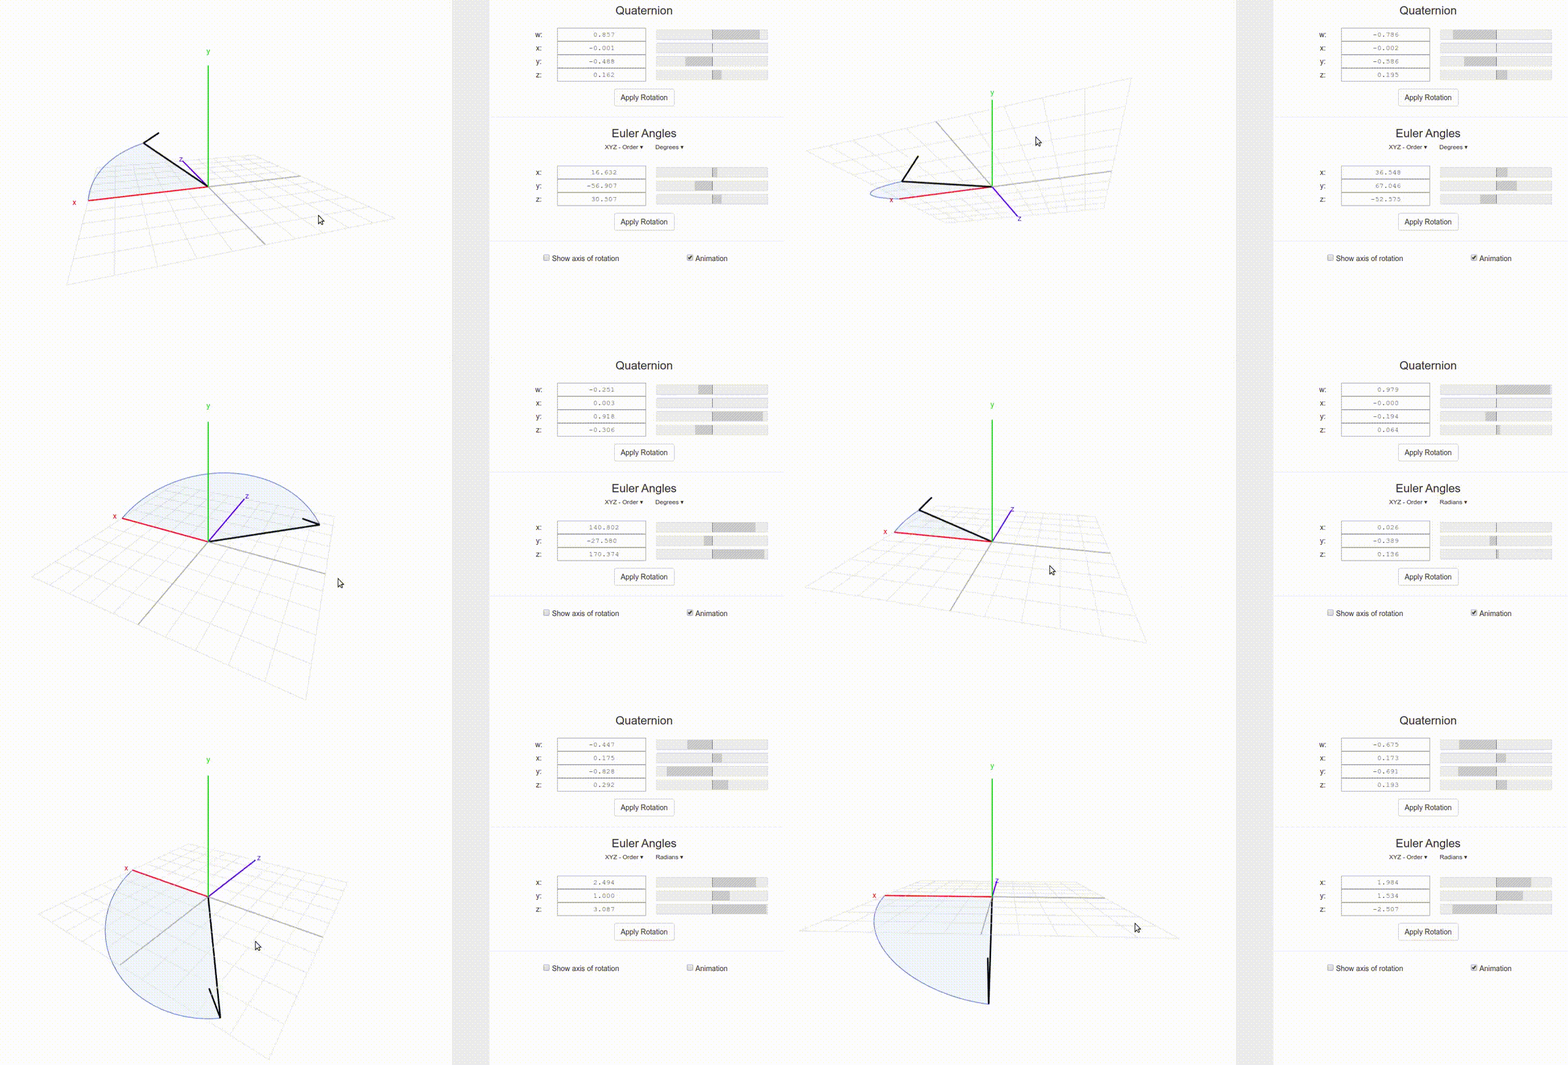
在这里有一个四元数和欧拉角在线转换的网页很好用,大家可以在参考资料中找到链接,该页面如下所示:
0x02 树莓派中使用串口读取IMU信息
下面我们首先在树莓派上演示,使用的是树莓派自身排针的串口来进行通信。在使用之前需要确保/dev/ttyS0已经有了,如果没有则可以通过下面过程来打开:
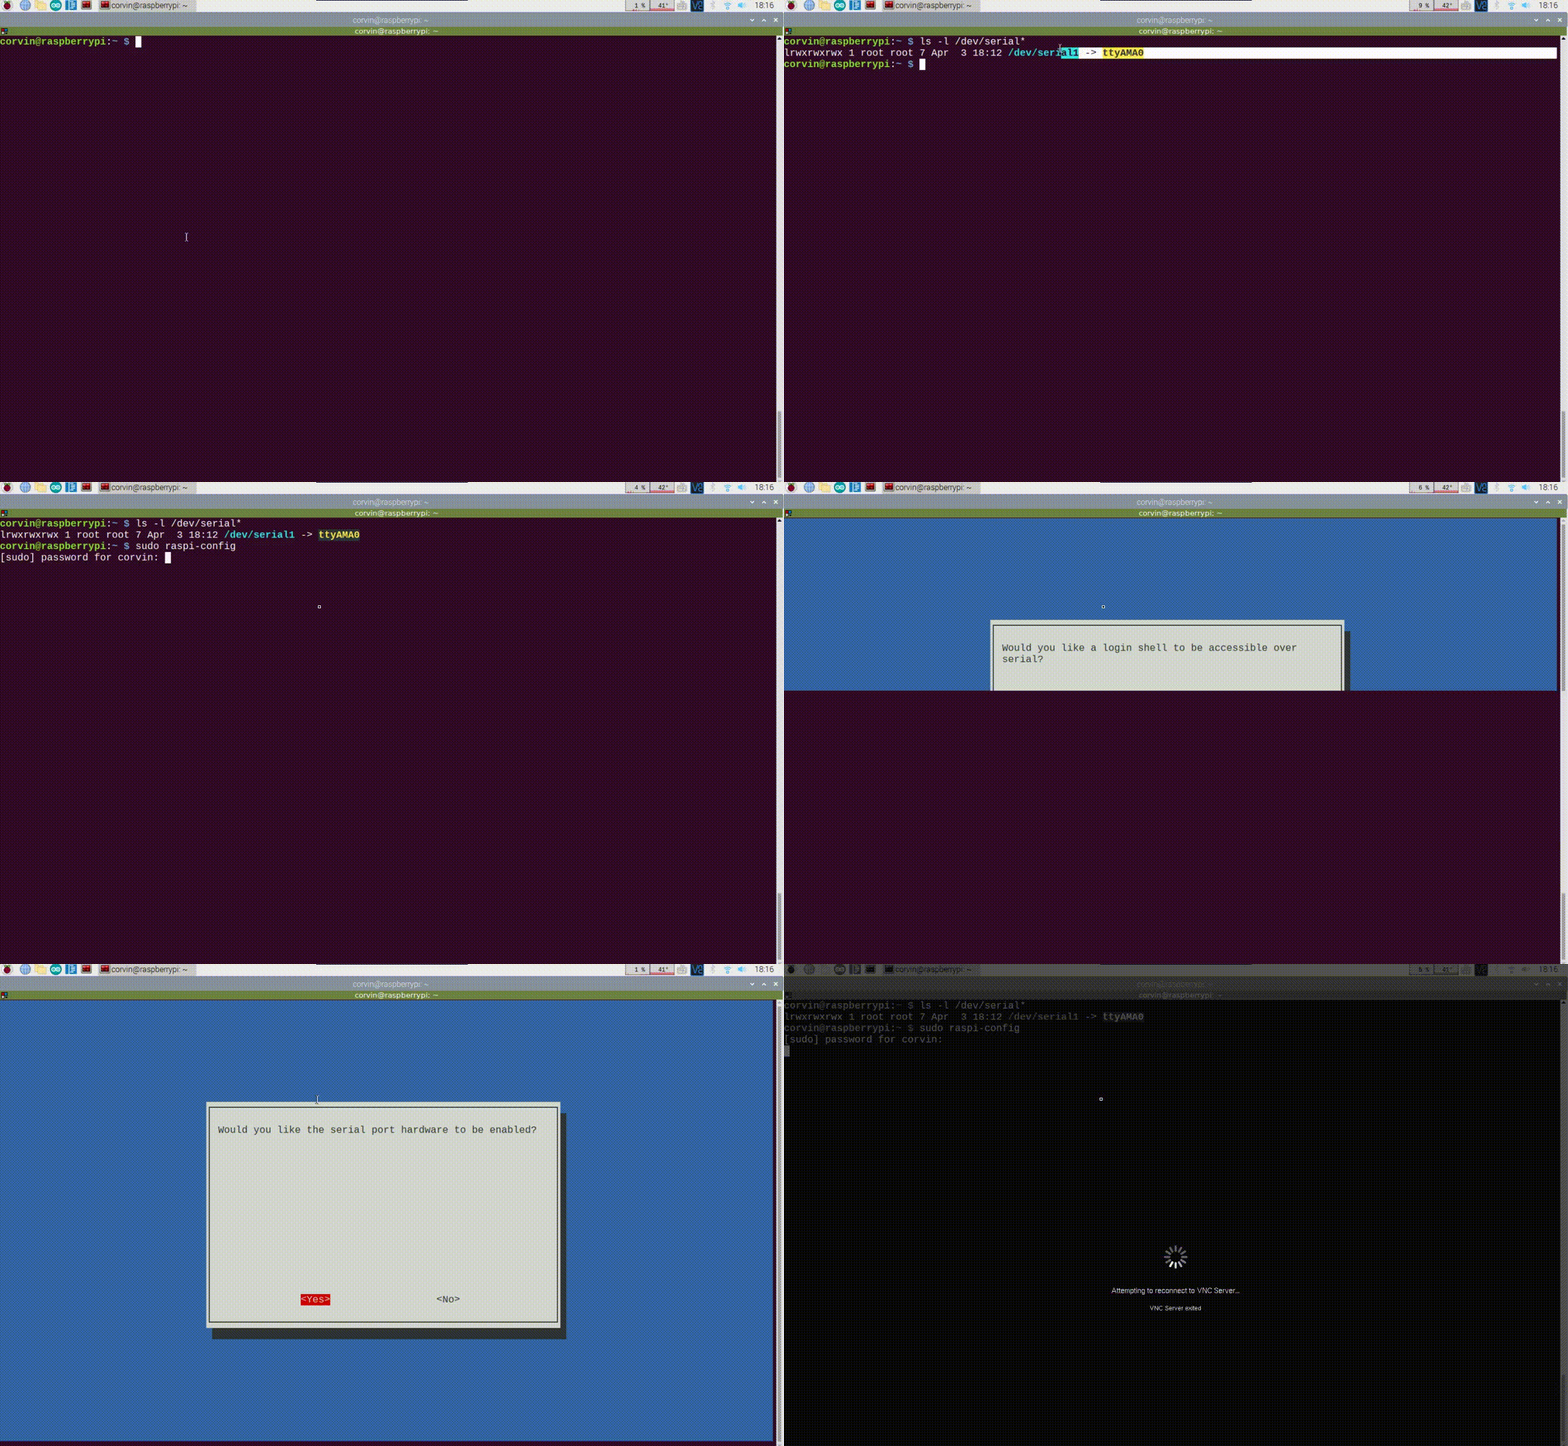
当确保已经已经启用了/dev/ttyS0后,接下来就可以来启动串口读取IMU模块并发布topic的节点了,完整的启动命令如下:
roslaunch serial_imu_hat_6dof serial_imu_hat.launch
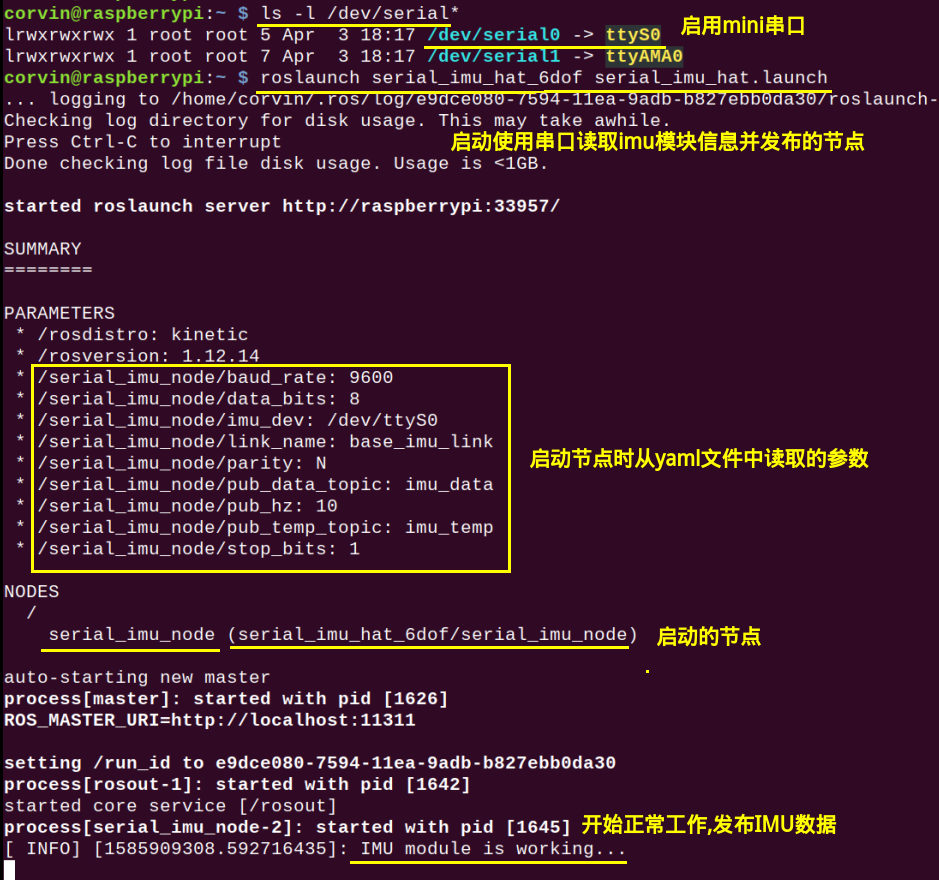
下面通过视频来演示如何在树莓派上使用串口读取IMU模块信息的整个过程,这样可以看到更为形象,如下视频所示:
0x03 使用usb转串口模块
如果要想在其他系统上使用IMU板,那就得使用usb转串口模块来进行通信了。常见的USB转串口模块都可以,我们使用的如下图所示:

在连线的时候也需要注意TX、RX的顺序,这里不用将USB转串口与IMU板的RX、TX反接,如下图所示:

下面来演示如何使用usb转串口来解析发布IMU数据信息,如下视频所示:
0x04 参考资料
[1].如何理解3D动画中的欧拉角以及死锁?https://www.matongxue.com/madocs/442.html
[2].四元数和欧拉角在线转换动画演示. https://quaternions.online/
0x05 注意事项
[1].目前IMU板串口通信波特率为9600,还无法修改该波特率,后面会继续完善代码增加可以修改通信波特率的功能。
[2].在树莓派上使用排针处的串口来获取IMU模块信息时,需要保证已经在raspi-config中关闭了串口登录功能,开启了硬件串口通信功能。
[3].当前串口通信时发布imu数据的频率最高为67 Hz,使用IIC进行通信时发布imu数据的频率最高115 Hz,这里串口发布数据频率慢的原因是现在串口波特率为9600,修改波特率高后也可以提高imu数据发布频率。
[4].在使用usb转串口模块连接IMU板时,需要注意将usb转串口模块的TX接TX,RX接RX。不用反接的原因是电路设计时已将外部串口与IMU模块的RX,TX反接了。
0x06 问题反馈
大家在文章中有发现有任何问题,可以直接在文章末尾给我留言,或者关注ROS小课堂的官方微信公众号,在公众号中给我发消息反馈问题也行。我基本上每天都会处理公众号中的留言!当然如果你要是顺便给ROS小课堂打个赏,我也会感激不尽的,打赏30块还会被邀请进ROS小课堂的微信群,与更多志同道合的小伙伴一起学习和交流!
